OPay WooCommerce Plugin
Throughout this page, you will learn how to install, configure, and activate the OPay Woocommerce plugin. After following closely the steps explained below, your Woocommerce shop will be able to start accepting payments through OPay's payment channels.
Before you start
The OPay Woocommerce plugin is not only designed to deliver the most convenient checkout experience, but is also developer friendly. This plugin integration is hassle free and comes with OPay's rich set of payment features. Please follow the steps outlined below and you can start accepting payments through OPay.
Note
Make sure you have an active OPay account or you can create an account.
In order to have a smooth and seamless integration, please make sure you have the following compatibility list satisfied.
| item | compatible version | References |
|---|---|---|
| WordPress | 5.1.1 or higher |
wordpress.org woocommerce.com |
| PHP version | 7.2.2 or higher |
wordpress.org woocommerce.com |
| WooCommerce | 3.6.1 or higher | woocommerce.com |
| WooCommerce database | 3.6.1 or higher | woocommerce.com |
Installation
This section illustrates how our gateway can be integrated with the WooCommerce plugin. Please follow the simple steps outlined below to integrate the OPay Woocommerce plugin with your WordPress/WooCommerce e-shop.
Installation methods are as follows:
-
The first installation method:Zip package installation
- the plugin.
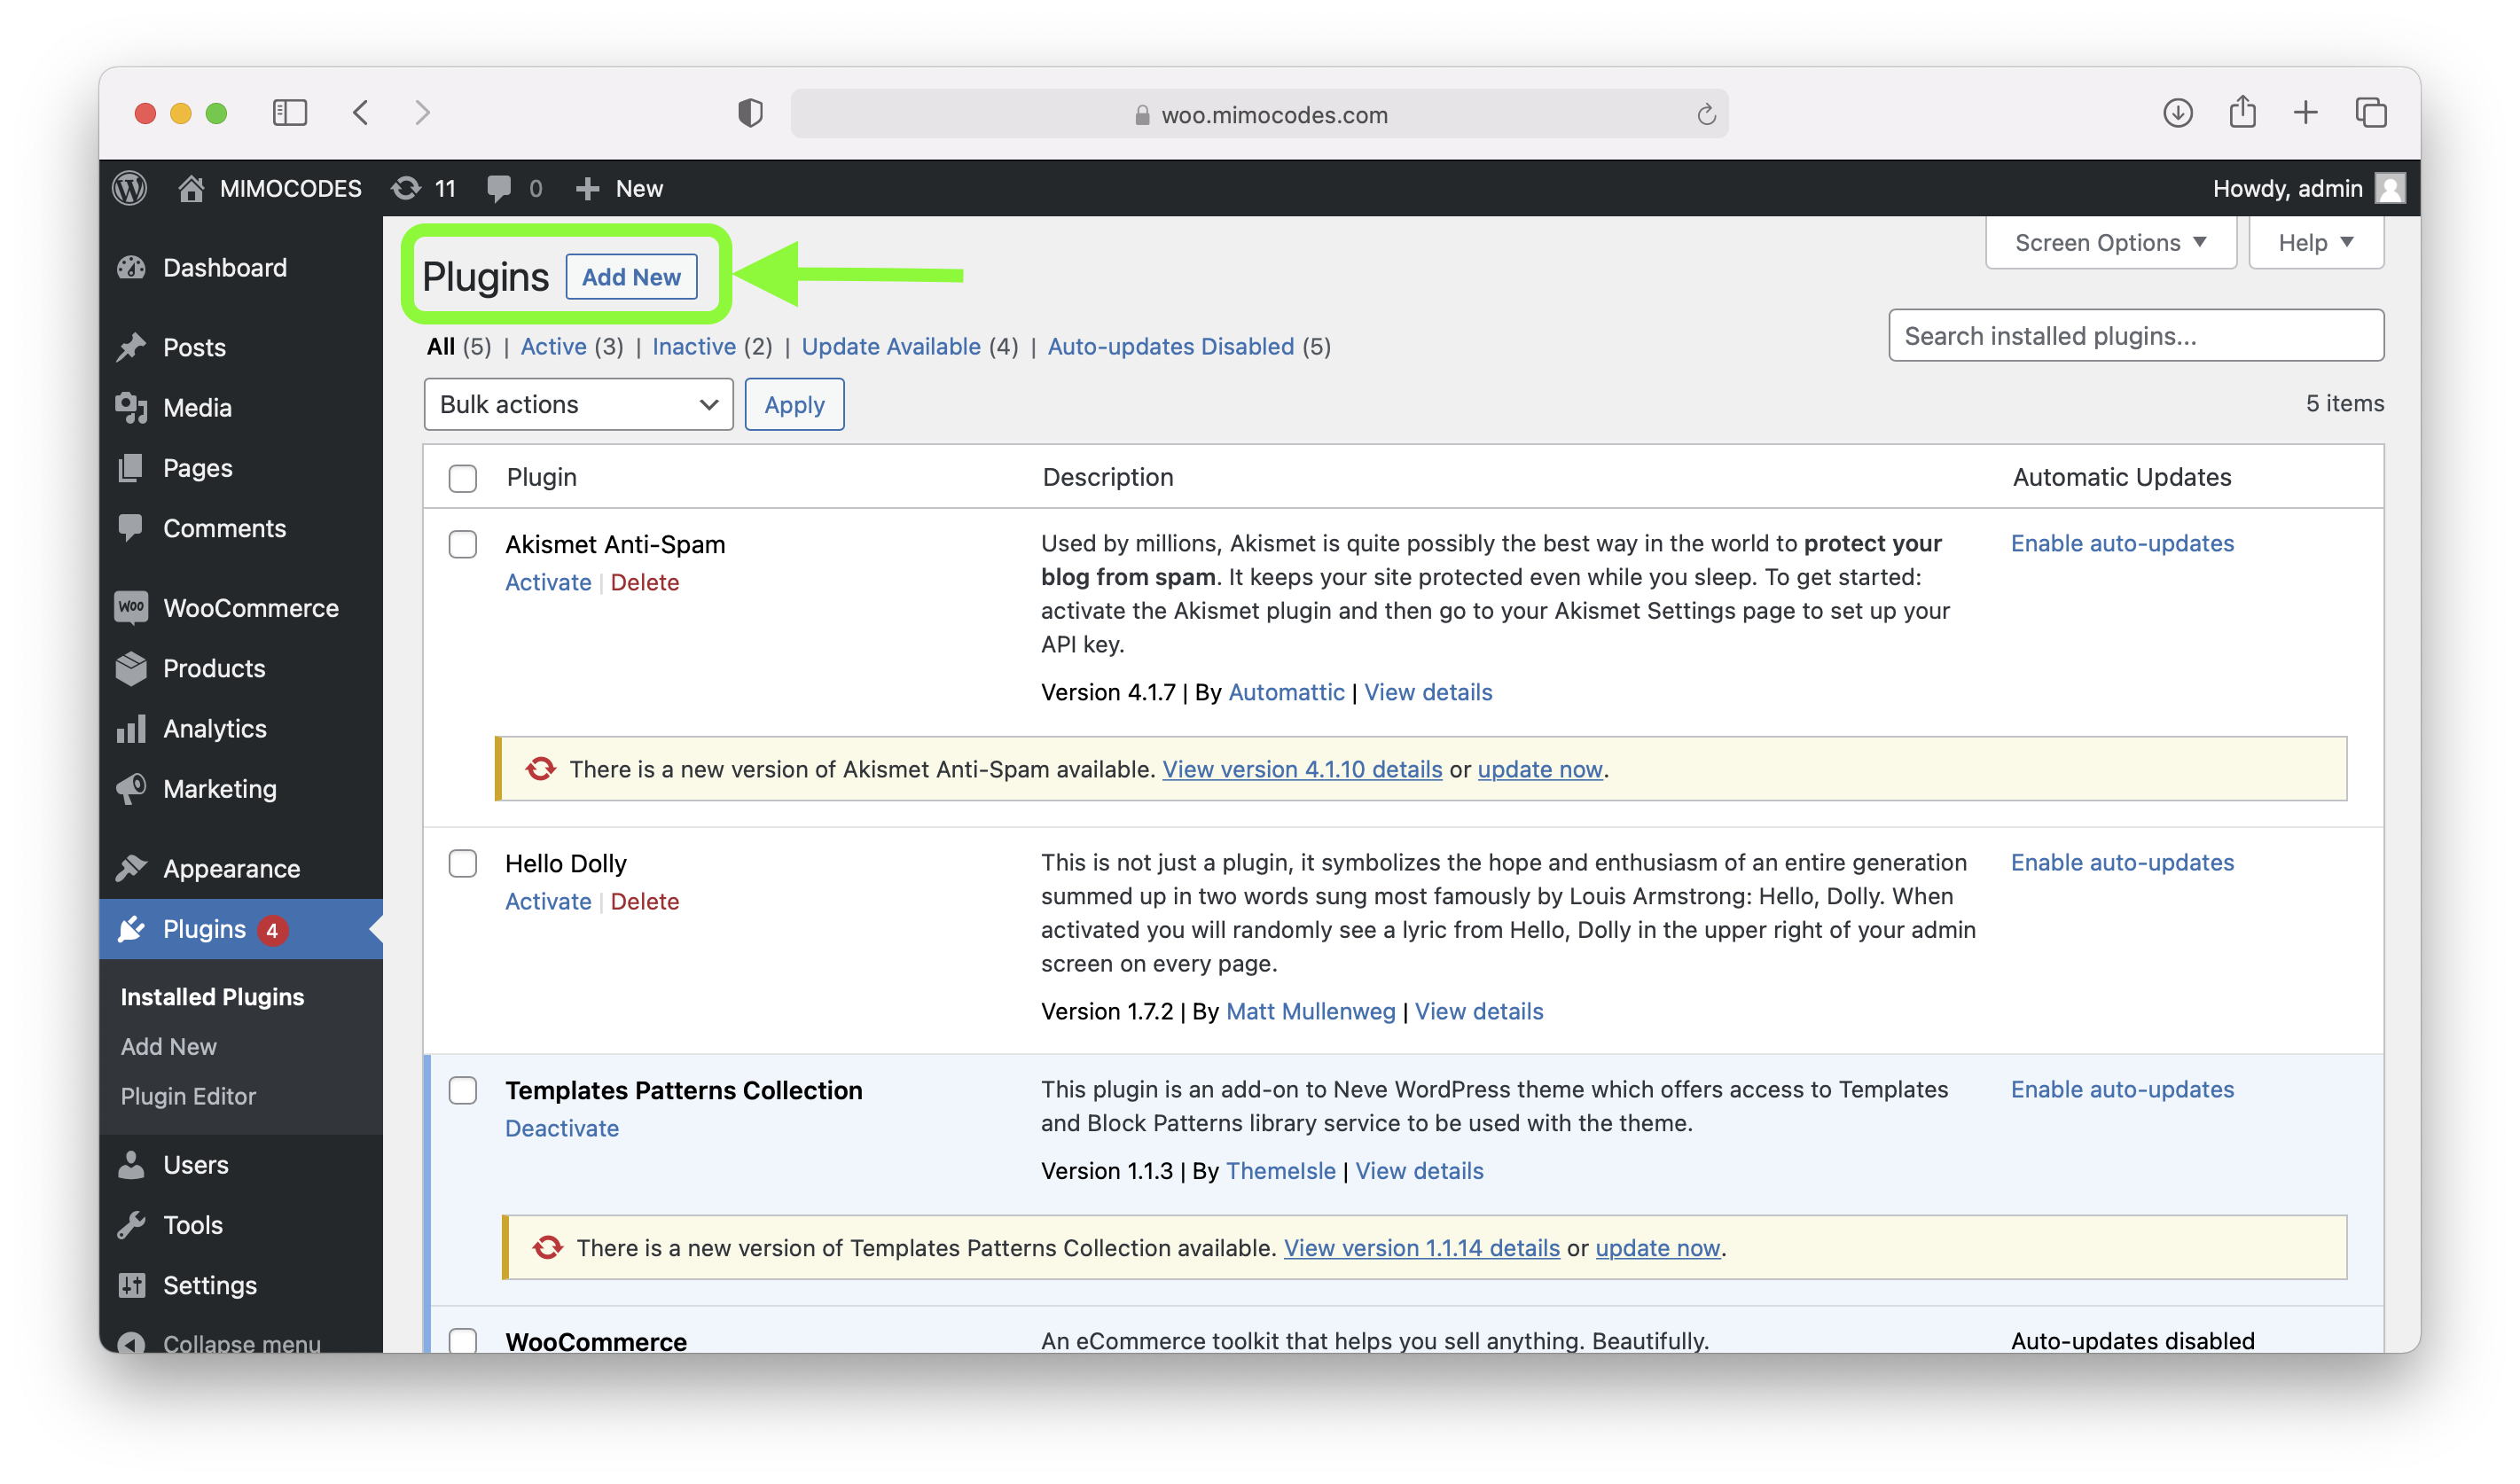
- Login to your WordPress Dashboard.
- In your WordPress Admin Menu, go to Plugins => Add New.
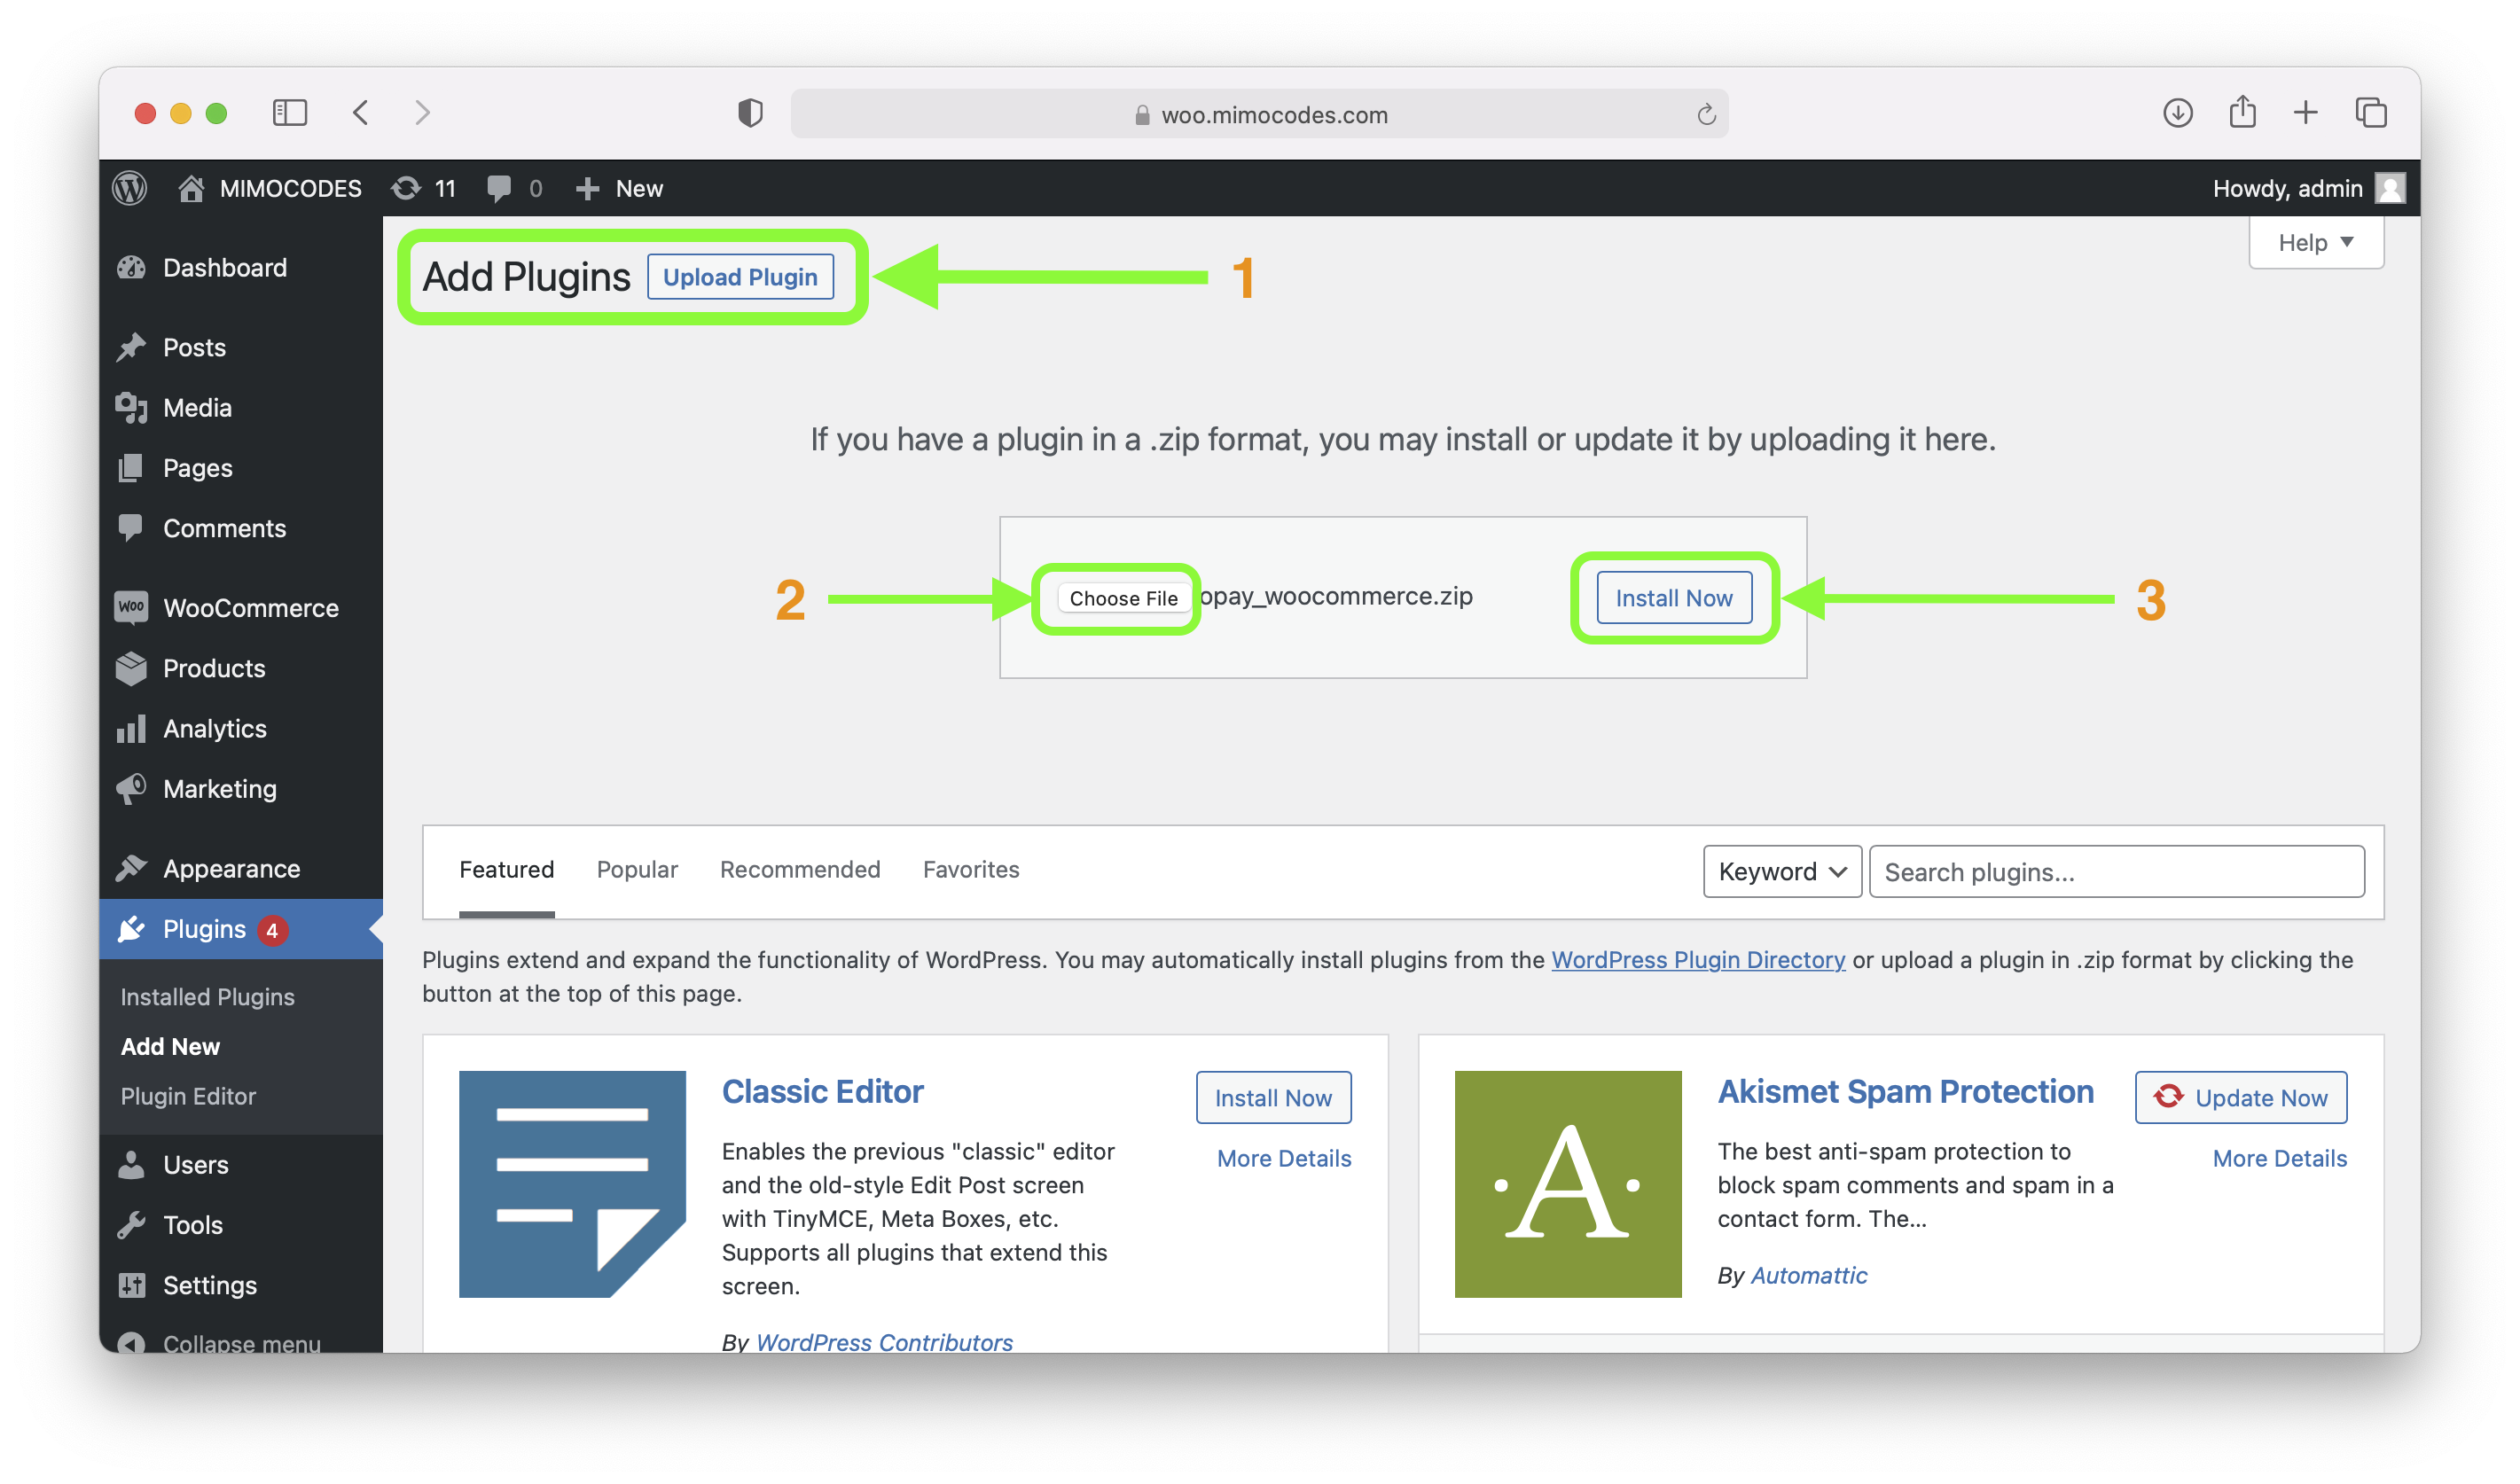
- Click on Upload Plugin button found on top left corner of page.
- Click on Browse (1), select the .zip file of your plugin from your computer (2), and click Install Now (3) button.
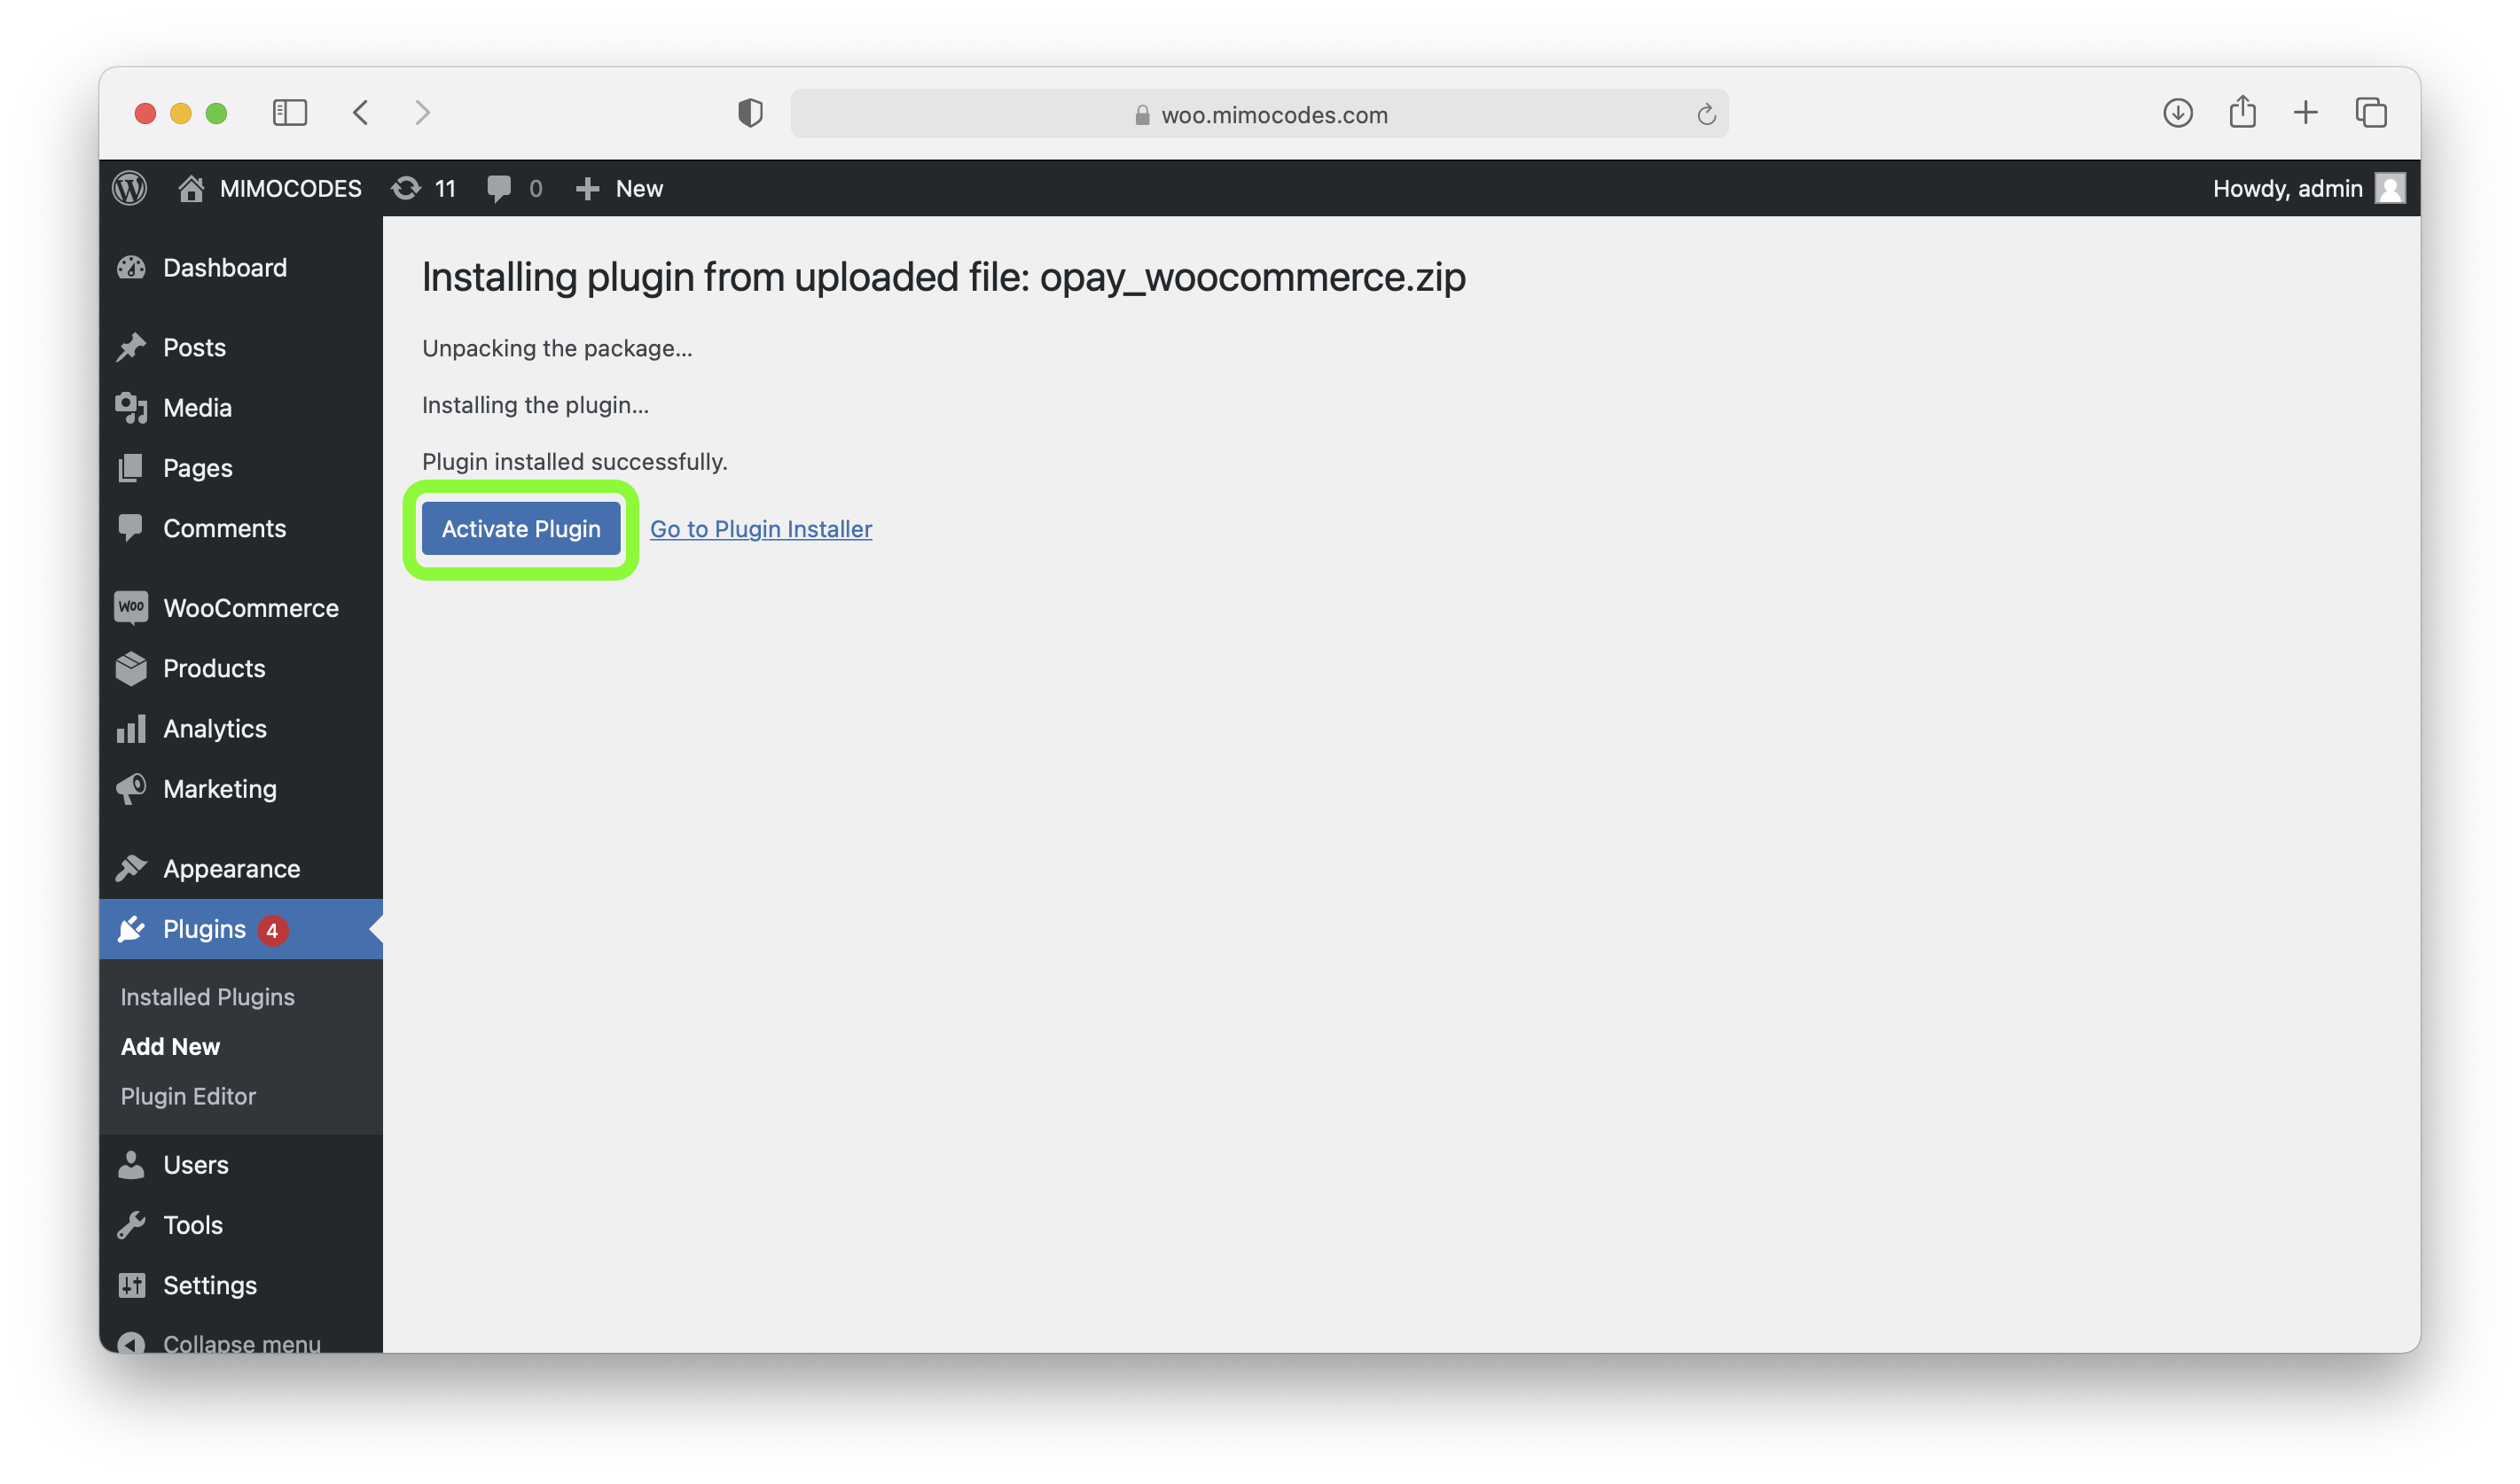
- At this point, the plugin is installed. You can click on Activate Plugin link.
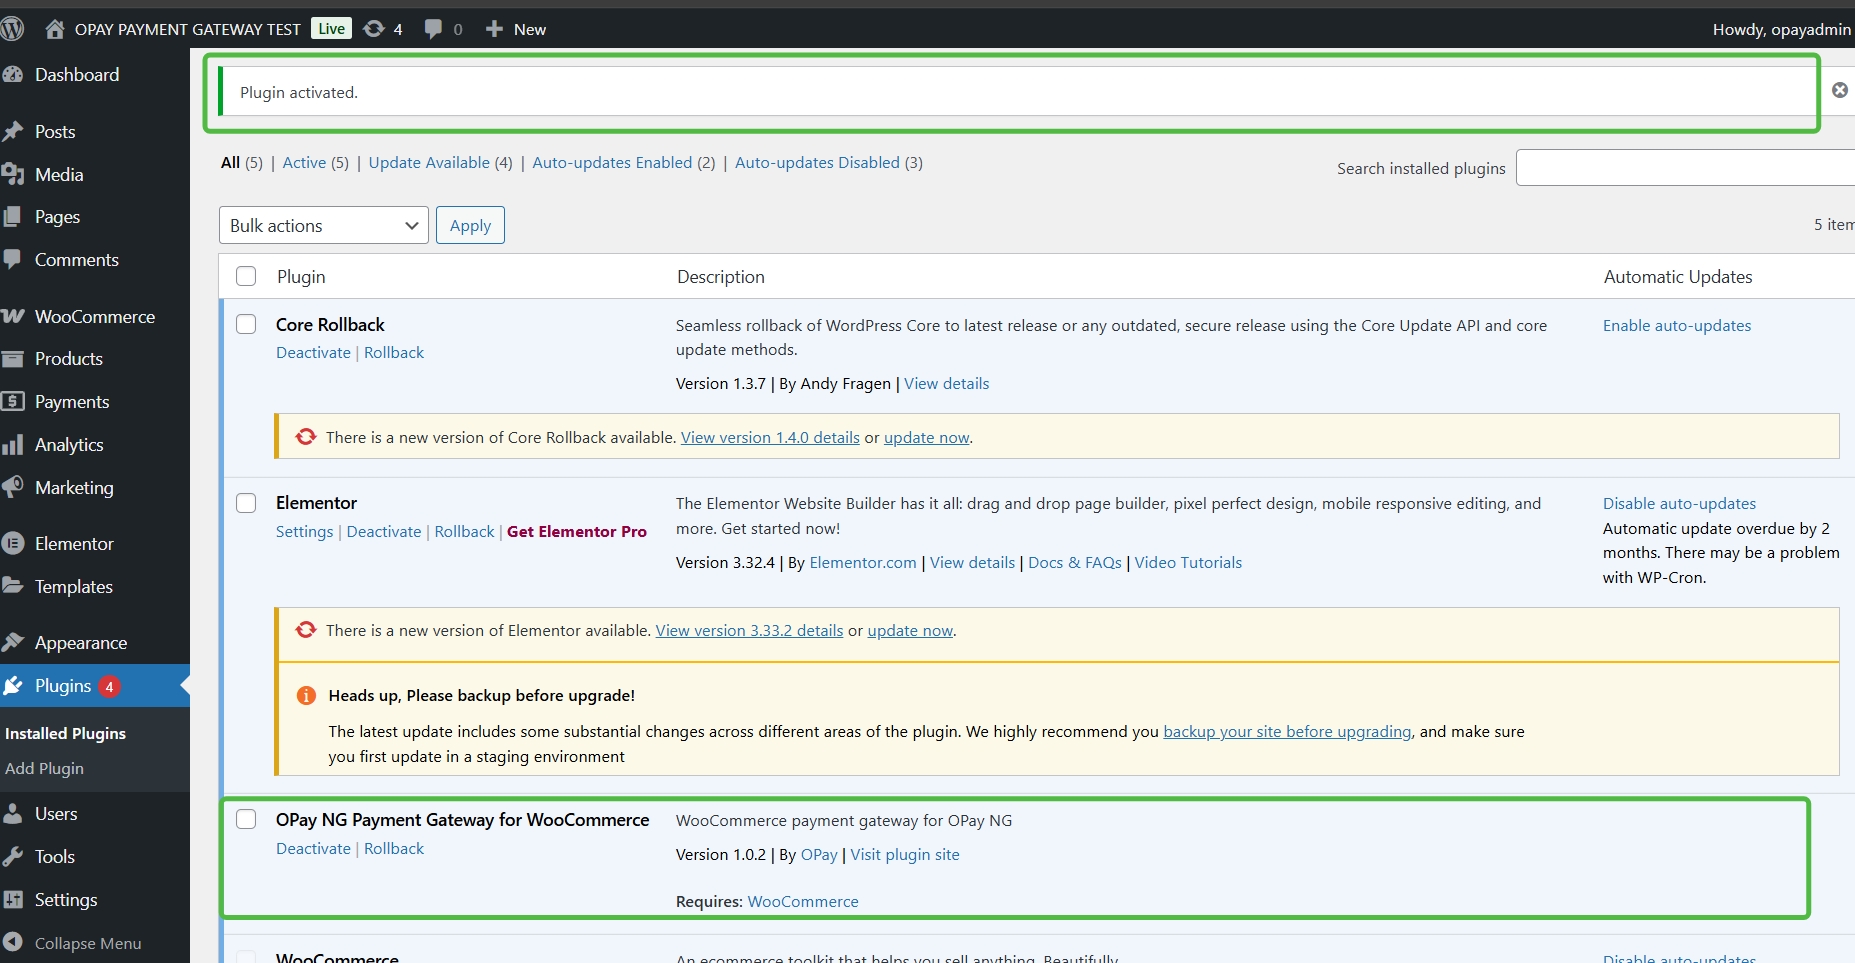
- In your installed plugins, find OPay entry and click activate.
- Well done, you have managed to install and activate Woocommerce OPay plugin!
Error
Renaming or other file manipulation on the downloaded plugin opay_woocommerce.zip file may cause the installation process to malfunction.
Warning
OPay plugin installation may encounter errors if WooCommerce was not installed properly. Please refer to the Before you start section for more information.
-
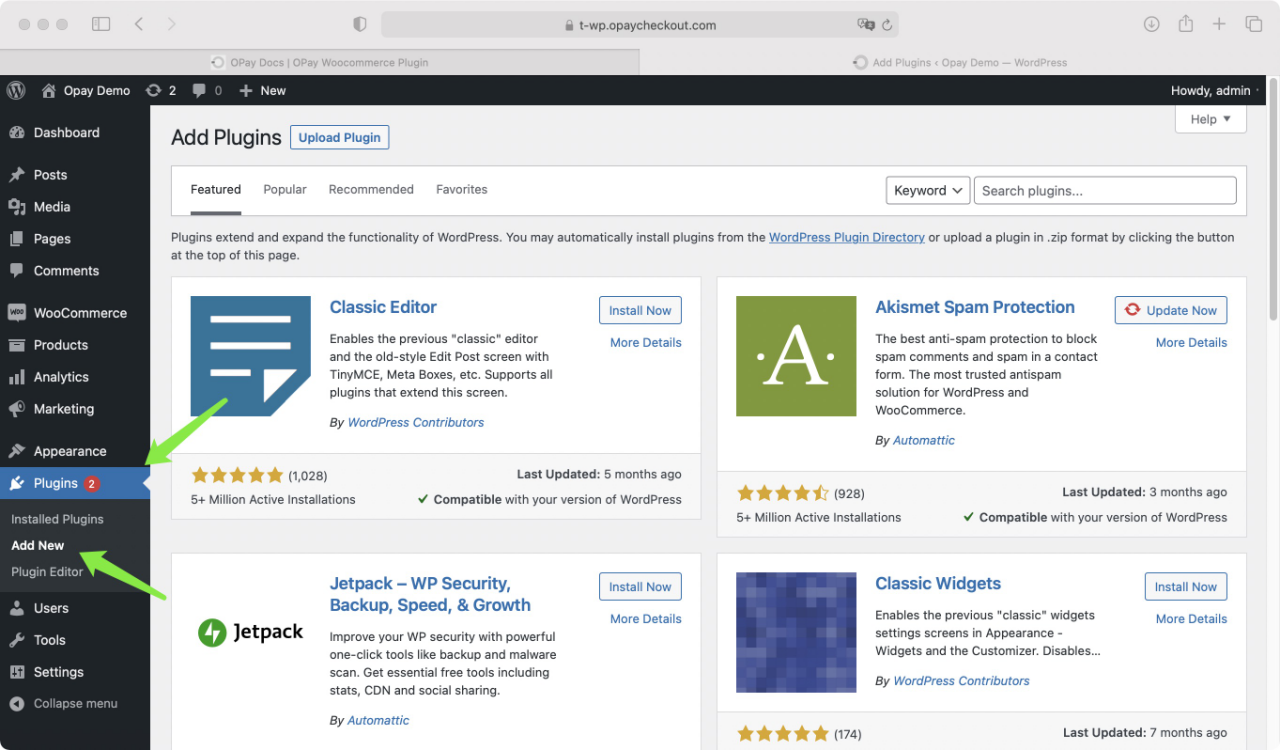
The second installation method:WordPress market store installation
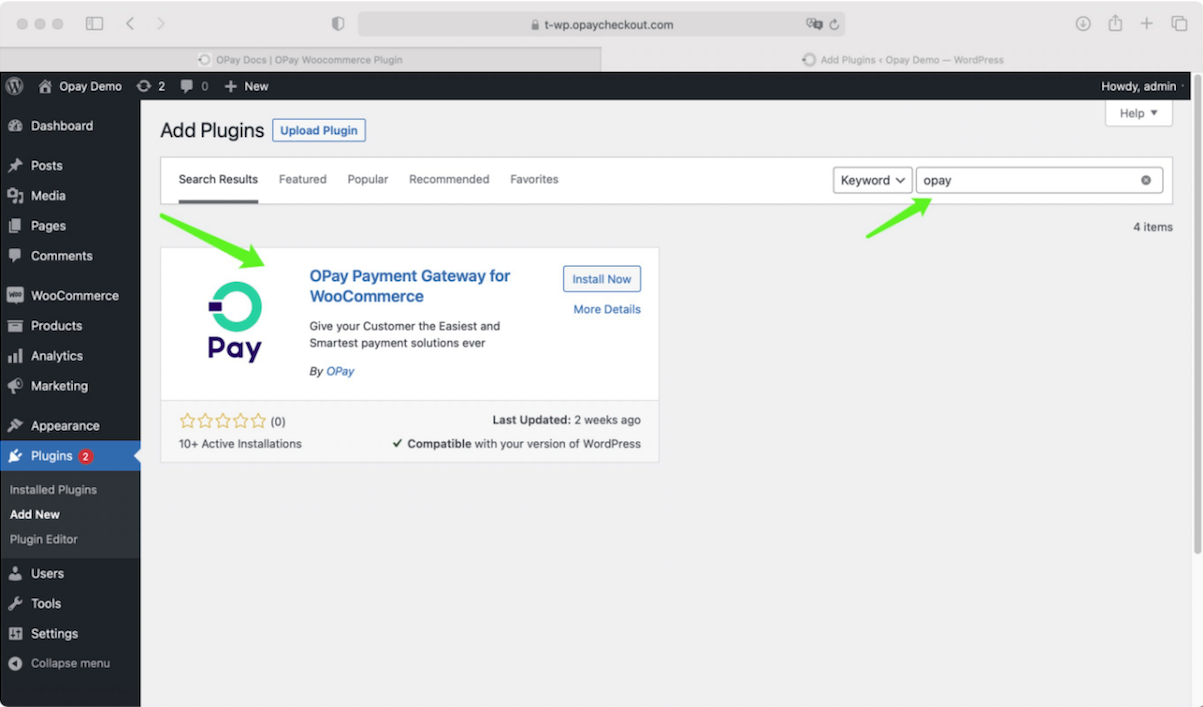
- Click on Plugin=>Add New.
- Search for 'opay' in the search box as shown,then press enter.
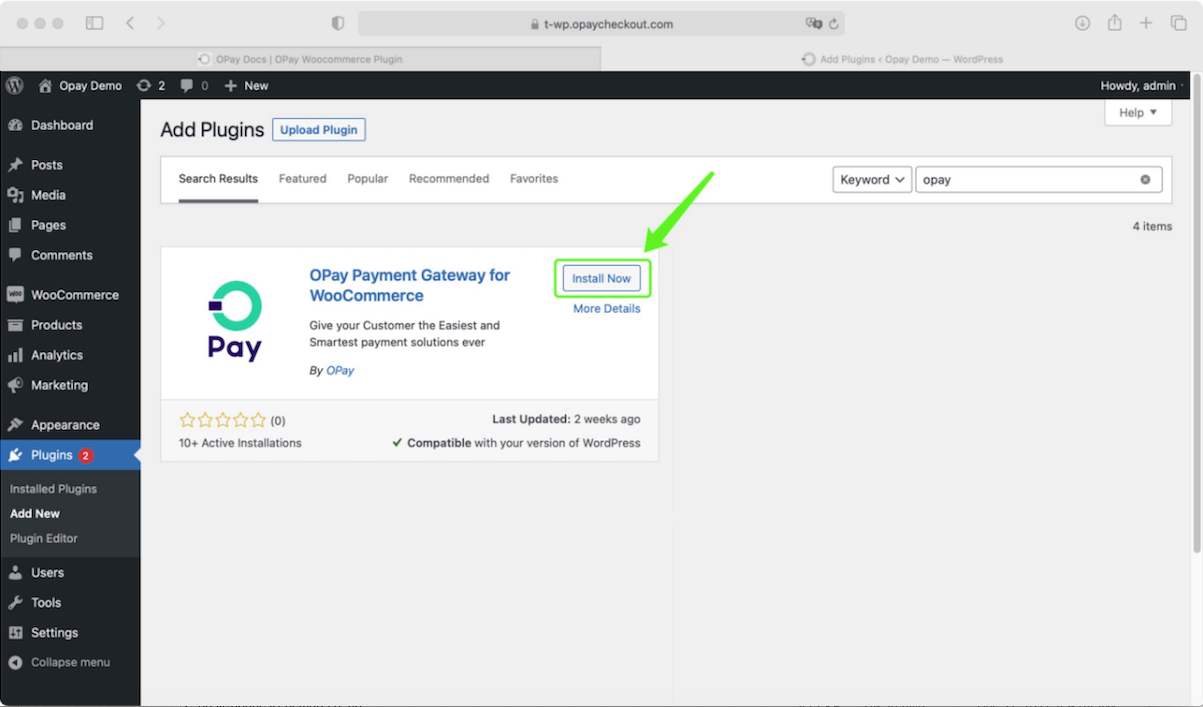
- Click 'Install now' to start installing the OPay plugin.
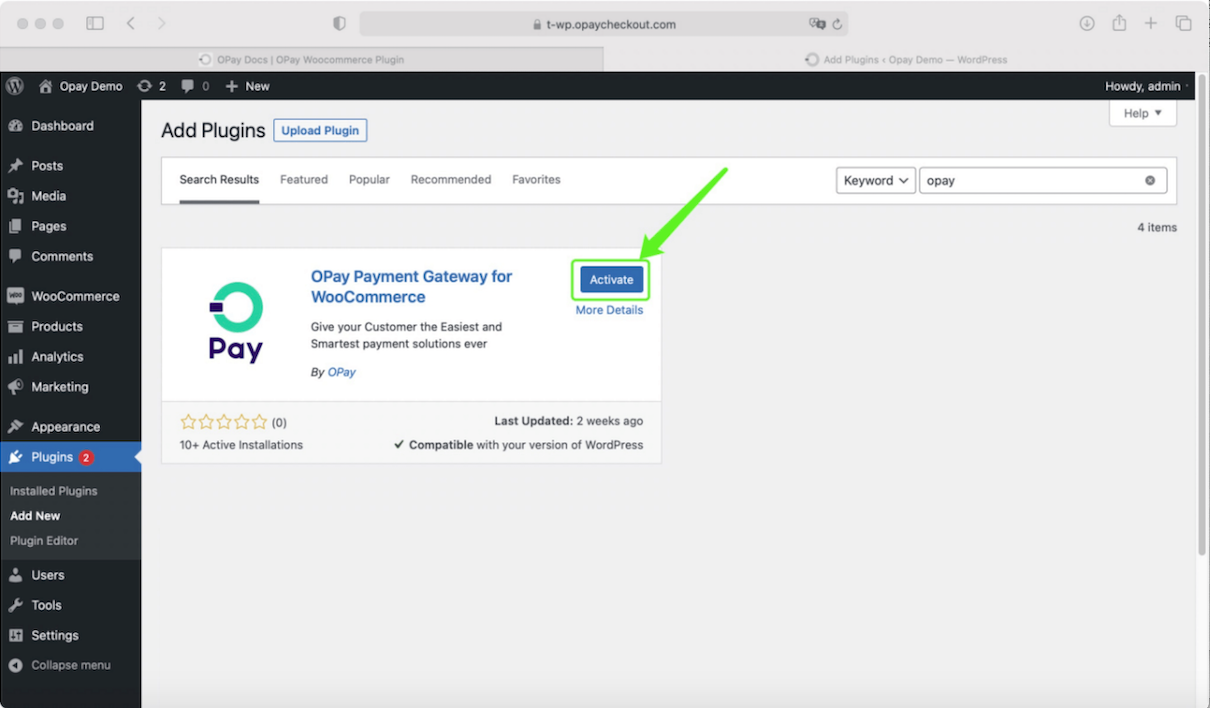
- After installation, click 'Activate'.
- Well done, you have managed to install and activate the WooCommerce OPay plugin!
You can also install the plugin from the WordPress plugin store. We have configured the plugin to the App Market to provide you with a more convenient installation experience. The installation process is as follows:
Set up and Configuration
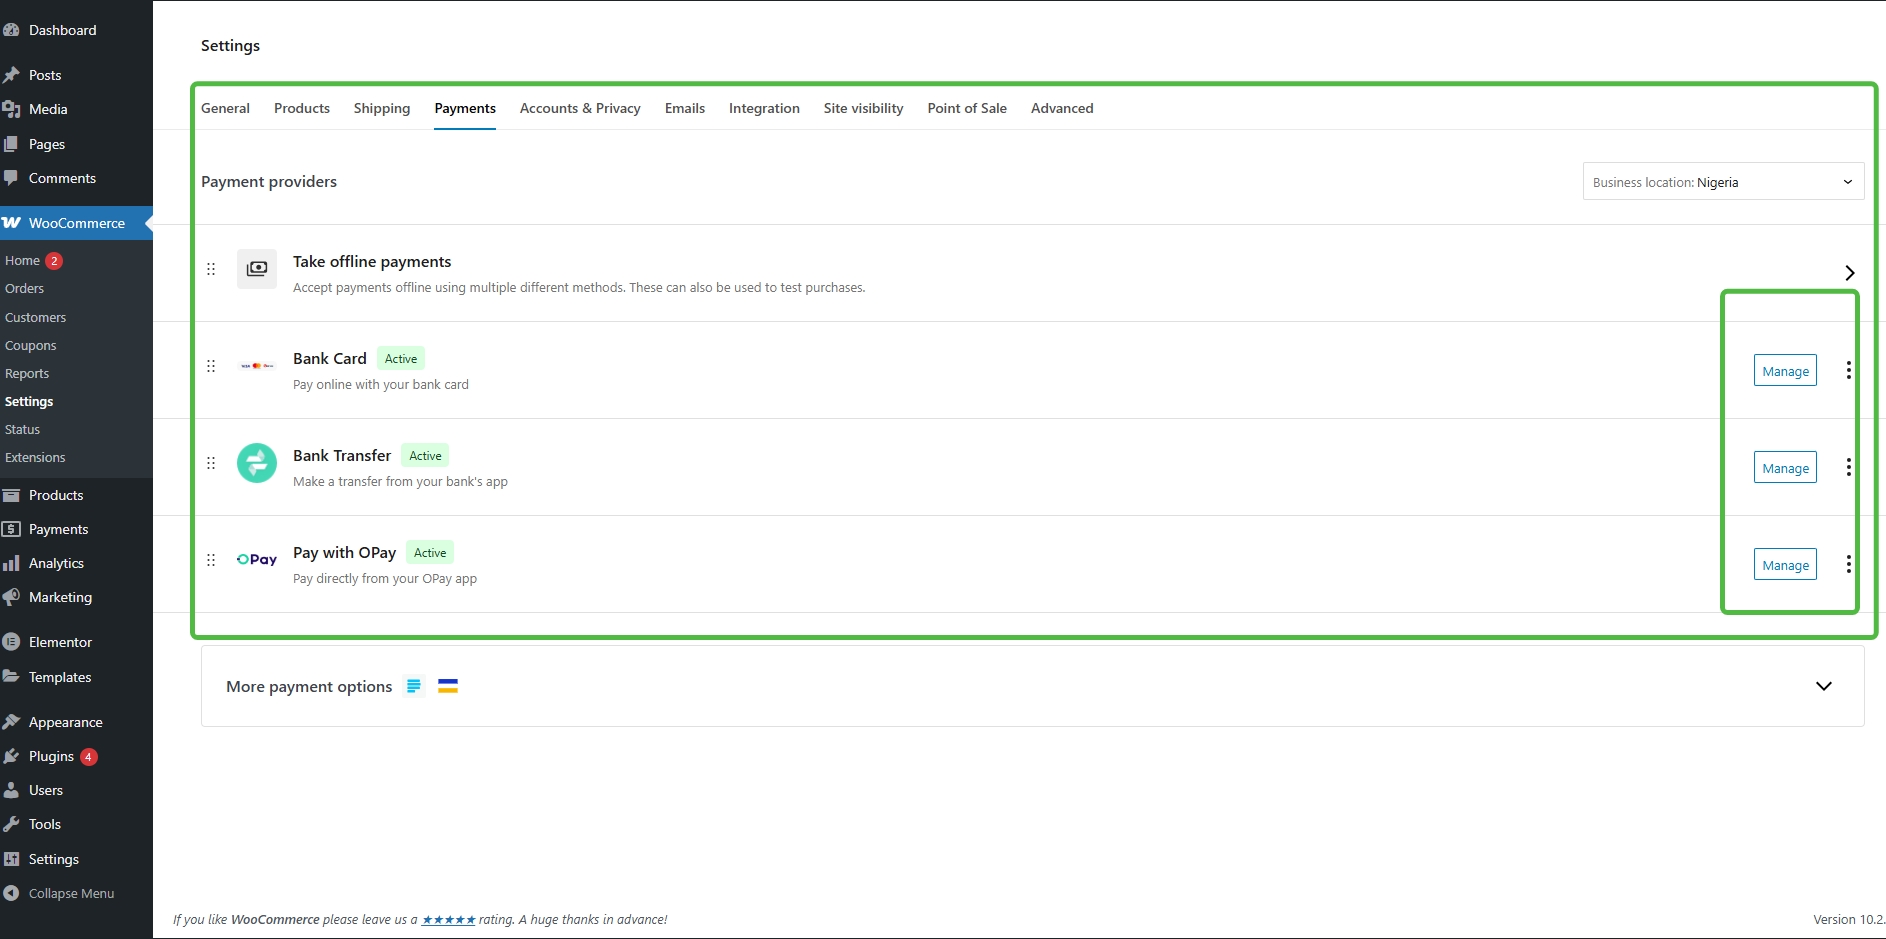
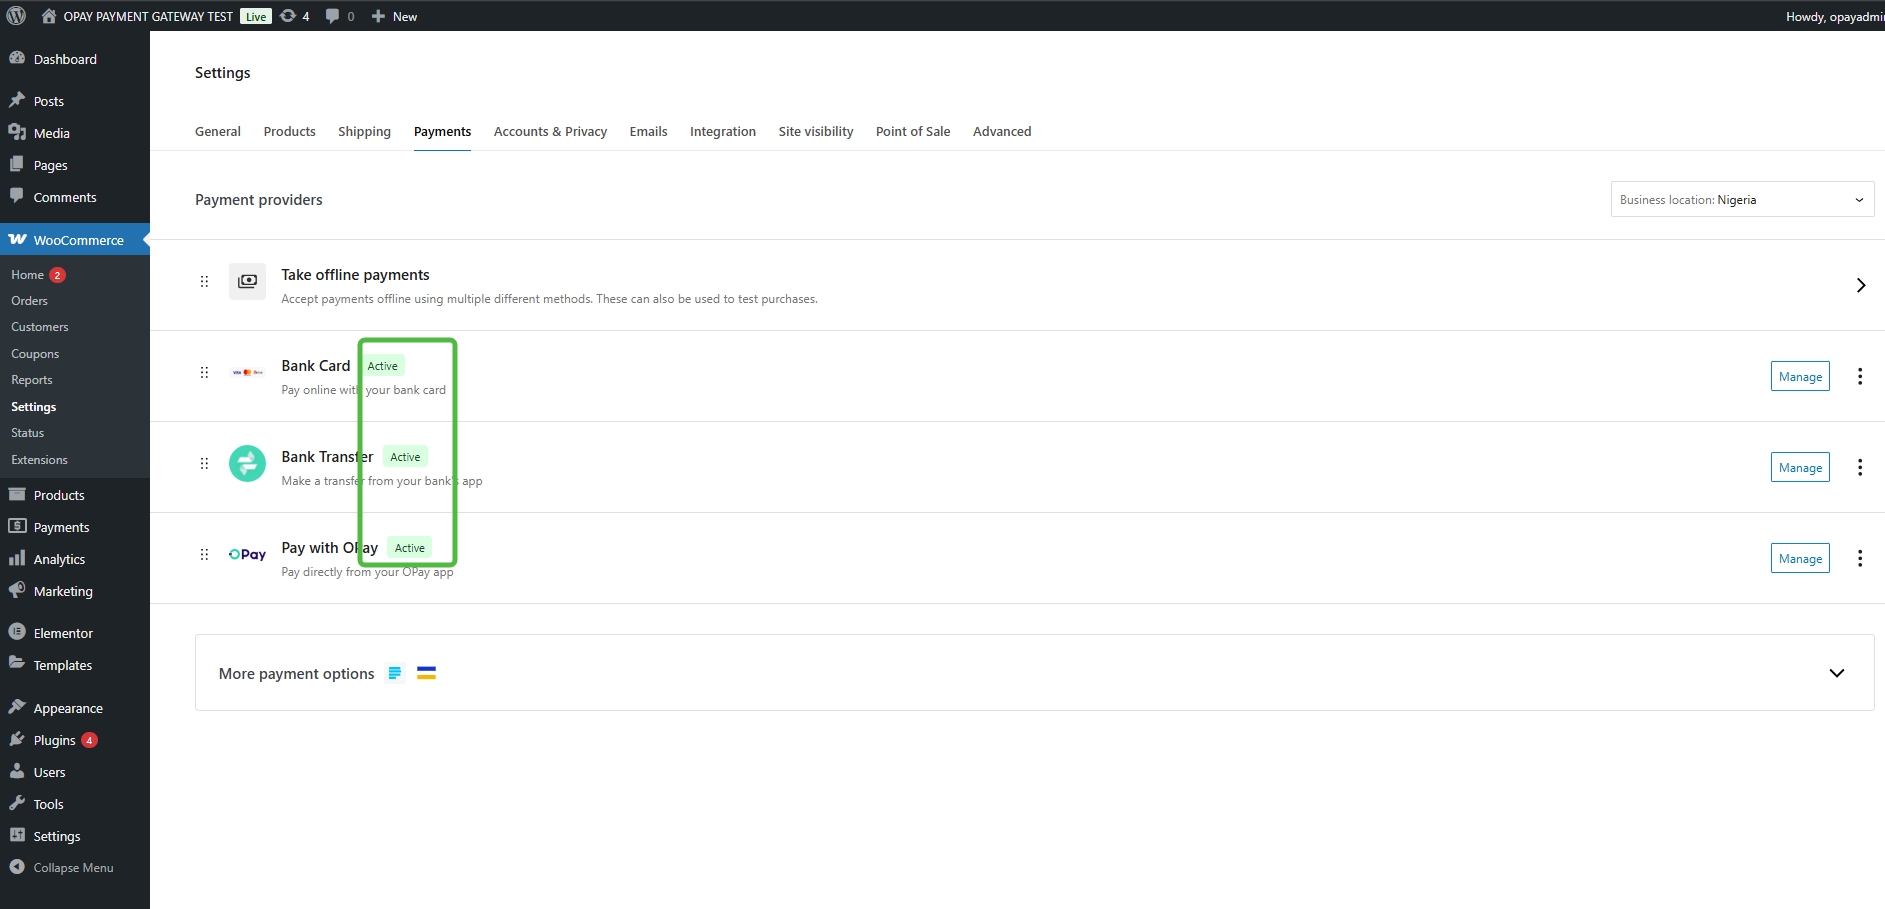
- Go to WooCommerce section.
- Select Settings subsection.
- In the settings page, click on the payment tab.
- You will find Three payment methods, which are Bank Card, Bank Transfer, Pay with Opay.
- Click on "Manage/Setup" button.
- Within the "Manage" page, please fill the fields as described in the following table:
- Once you're done, click on save changes button.
- Enable both OPay payment methods and click
save changes. - Bank Card
- Bank Transfer
- Pay with Opay
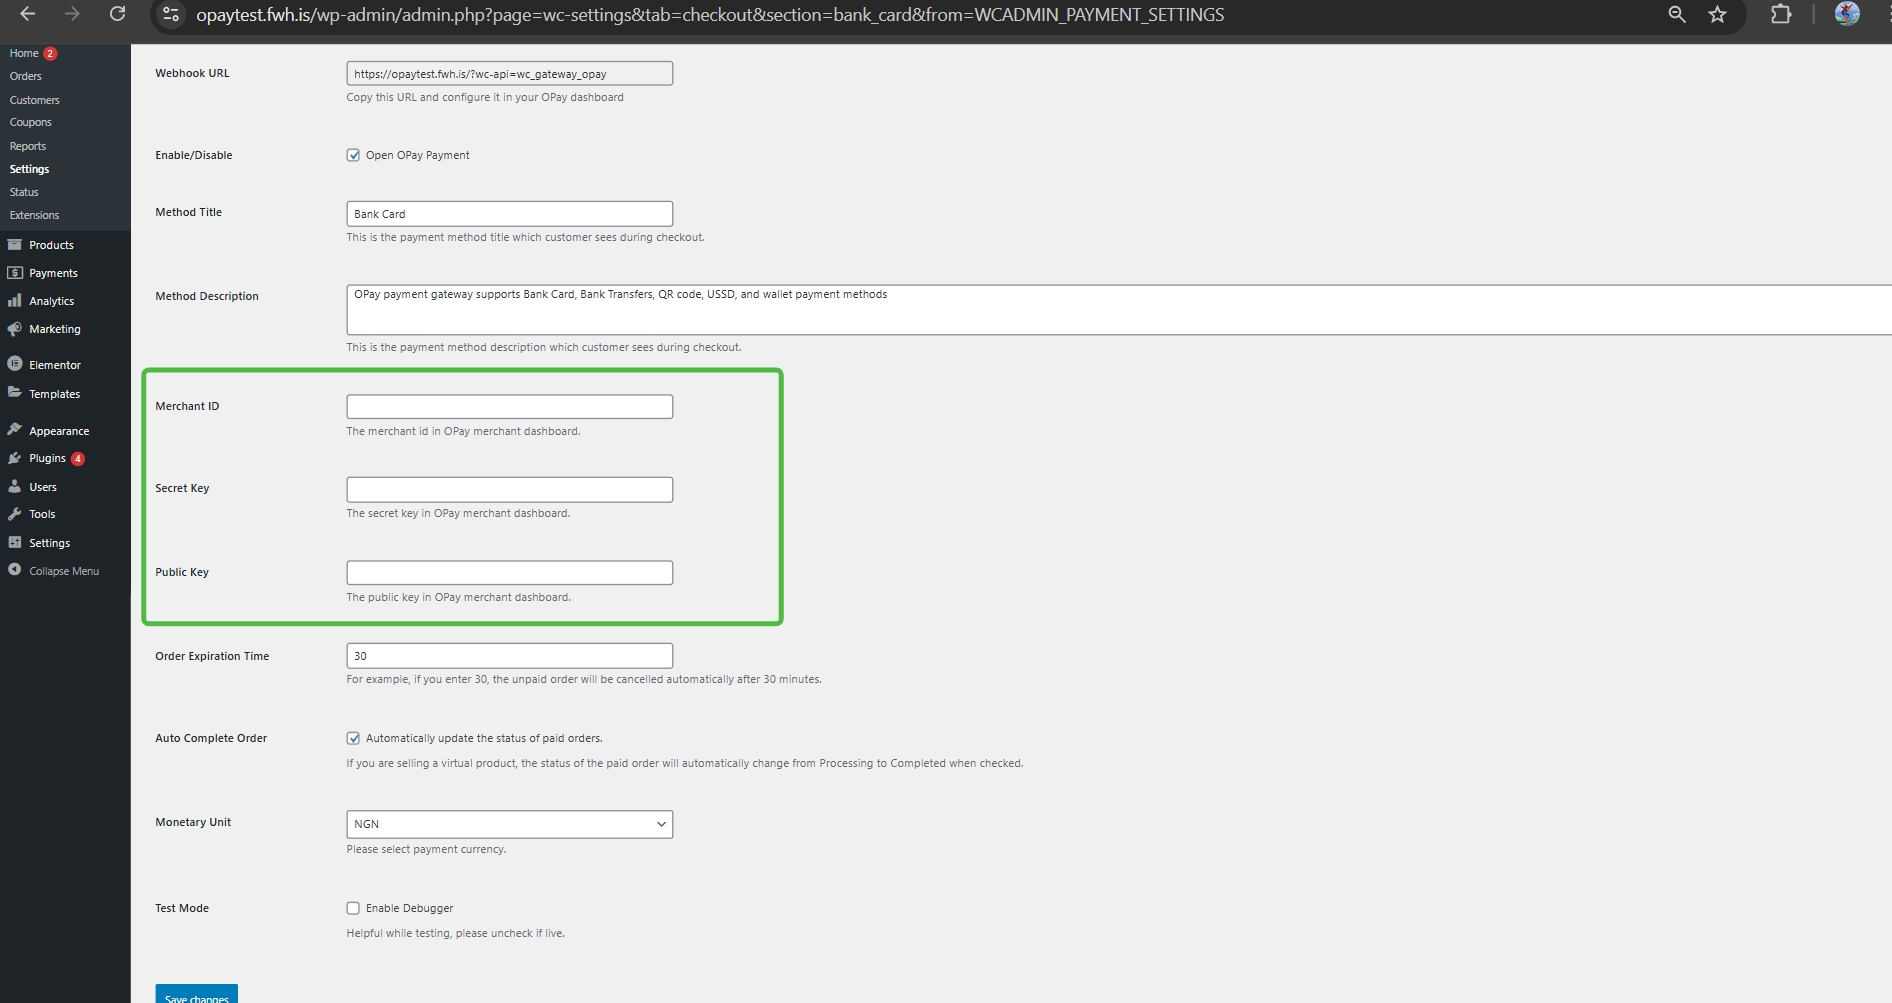
| field | description | example |
|---|---|---|
| open OPay Payment | Enable or Disable OPay payment method. | Checked |
| Method Title | The title for the payment service to be displayed to your customers. | VISA | Meeza | MasterCard |
| Method Description | Payment service description to be presented to your customers. | OPay payment gateway supports Bank Card, Reference Code payment method etc. |
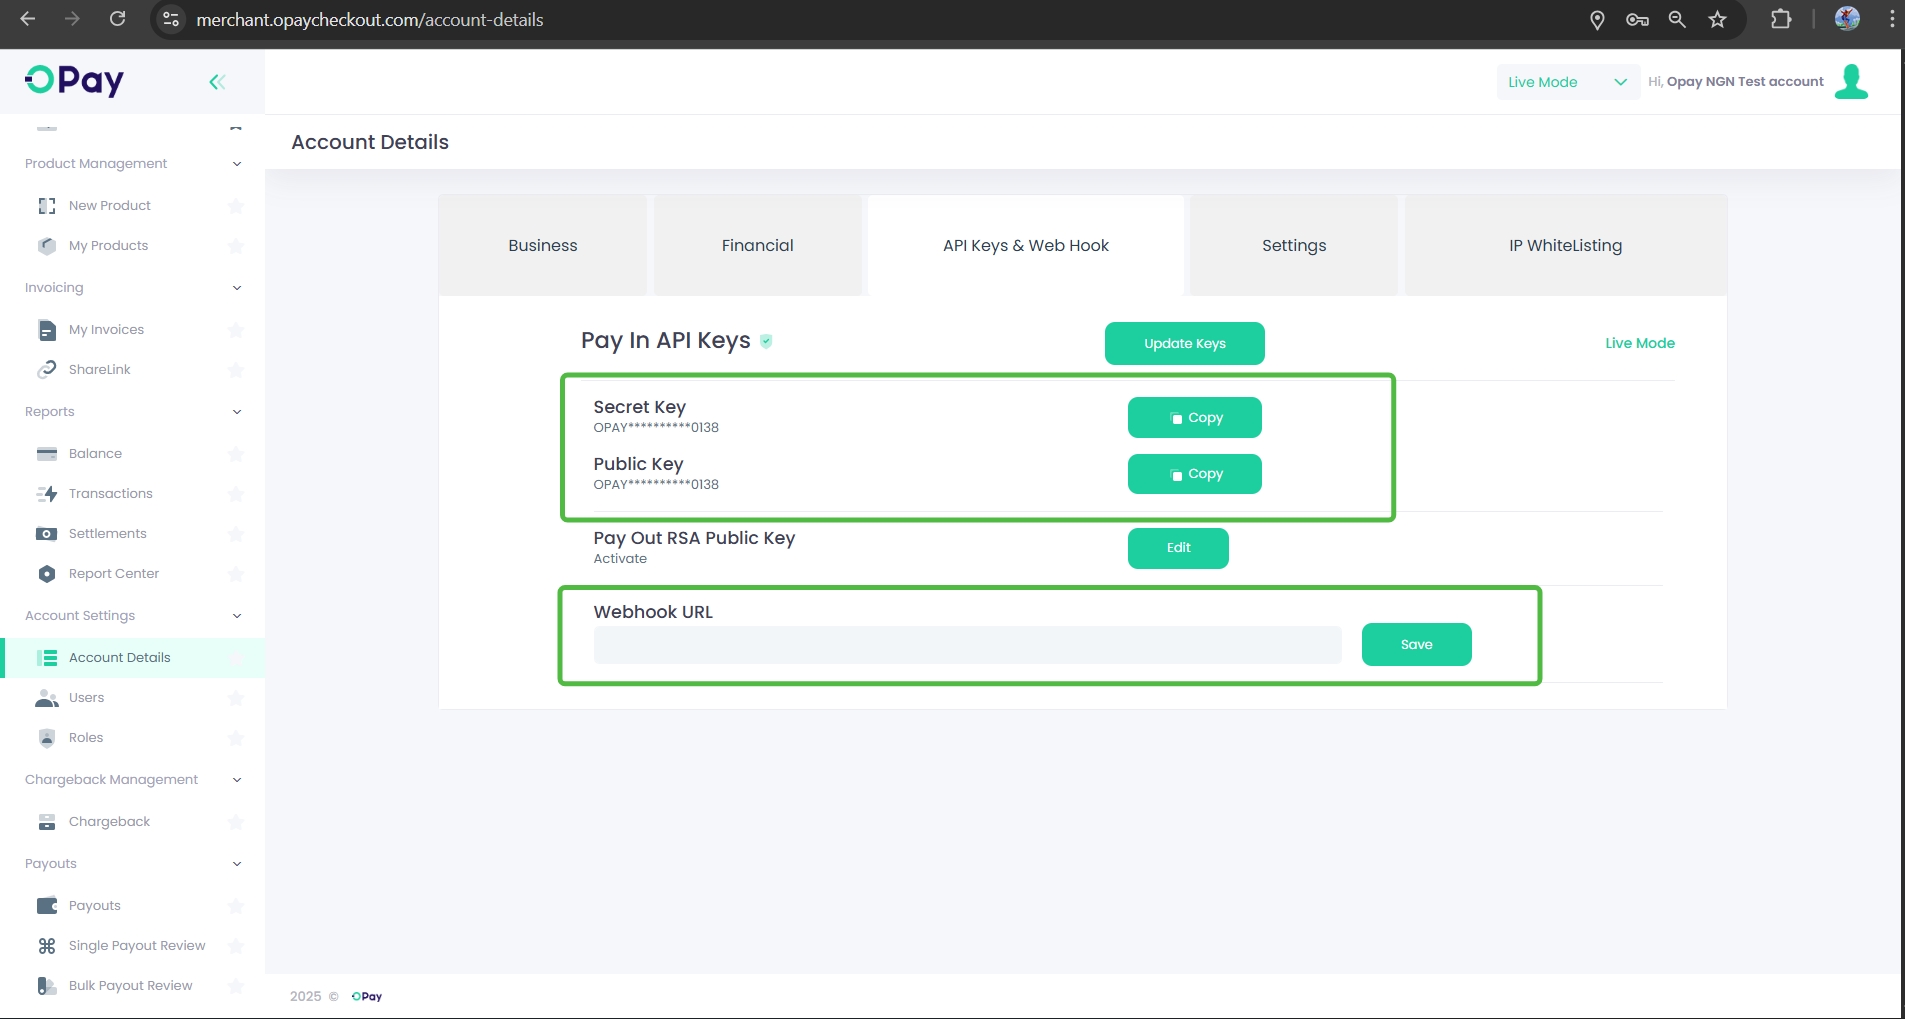
| Merchant ID | Your OPay account merchant ID (encrypted code) you should have received it after creating an account. | 256612345678901 |
| Secret Key | Your OPay account Secret key (encrypted code) you should have received it after creating an account. | Secret Key |
| Public Key | Your Sandbox Public key you should have received it after creating an account. | Public Key |
| Order Expiration Time | For example, if you enter 30, the unpaid order will be cancelled automatically after 30 minutes. | 30 |
| Auto Complete Order | If you are selling a virtual product, the status of the paid order will automatically change from Processing to Completed when checked. | Checked |
| Monetary Unit | Please select payment currency. | Select NGN |
| Test Mode | Tick this checkbox if you wish to test before going live. Untick to begin accepting payments with OPay. | checked |
Congratulations!
Your WooCommerce E-shop is now ready to accept payments through the OPay payment gateway.
Warning
Supported payment methods:
Verify your installation
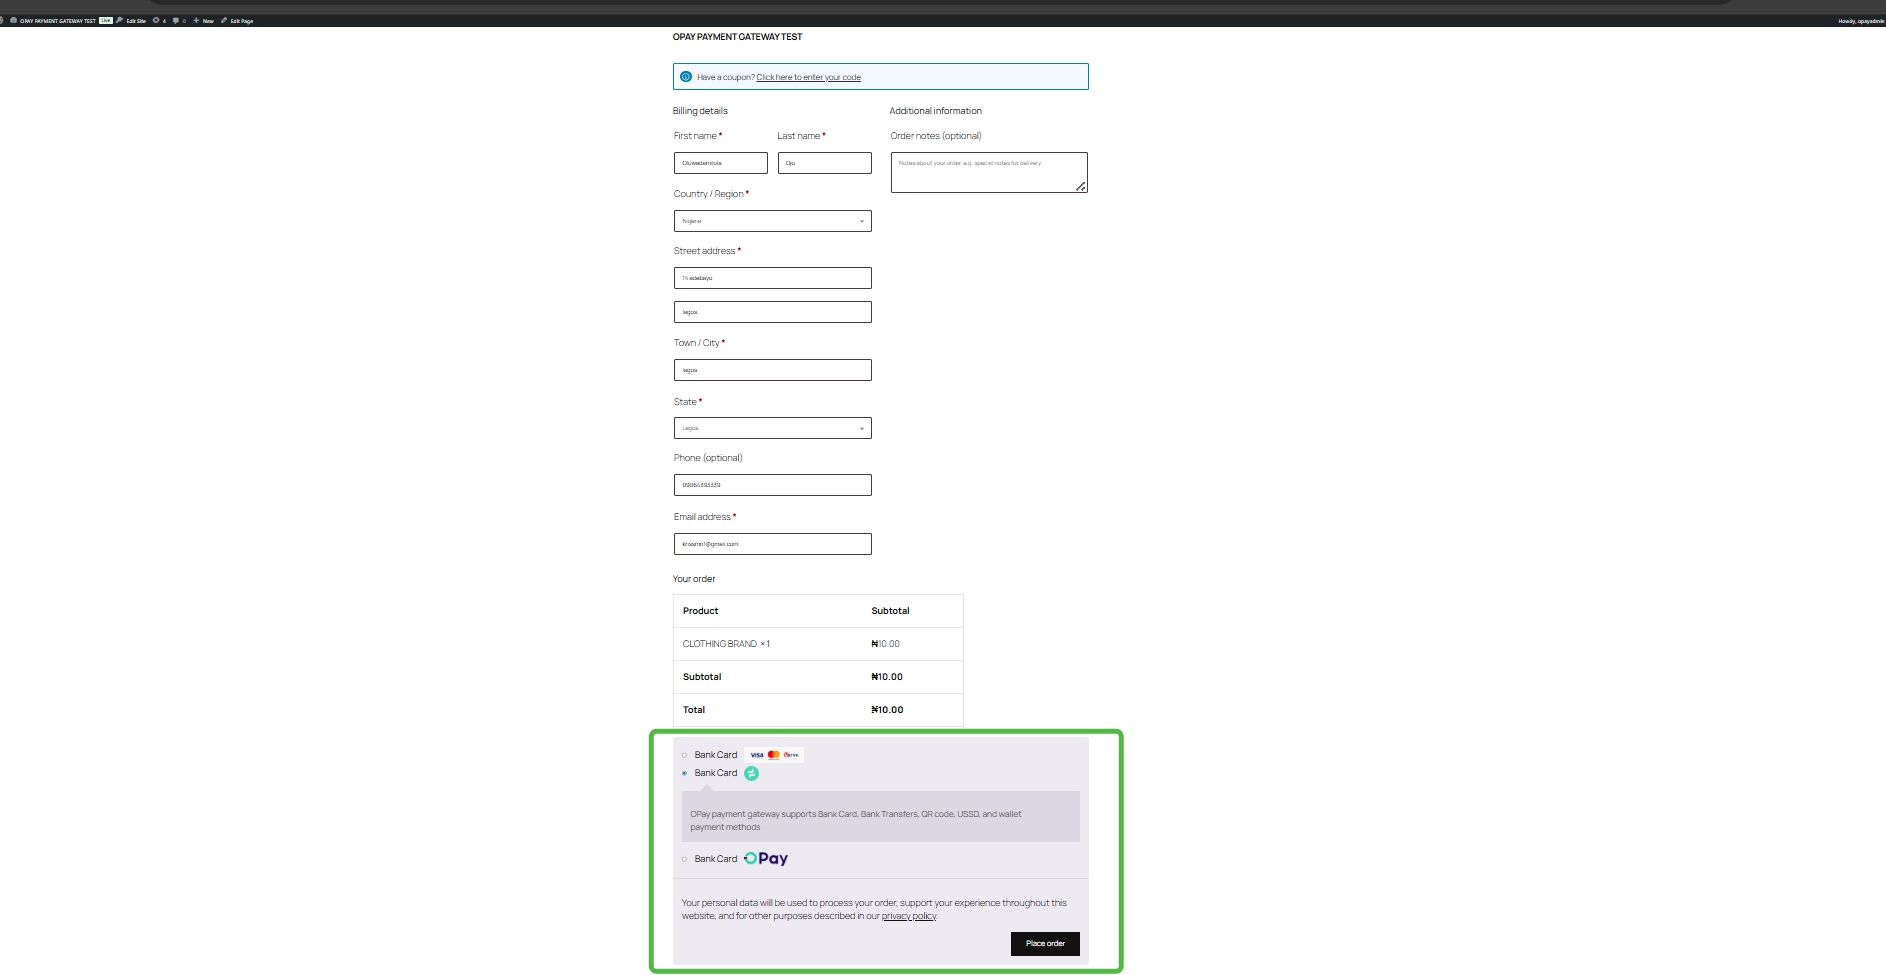
- Create a test order on your site and proceed to checkout page.
- In your checkout page, OPay payment methods should be readily available to your customer.
- Once you click on
Place Order, OPay Cashier page will appear to your customer to complete the payments. - Once your customer completes the payment, OPay Cashier will redirect your customer to the order received page.

Note
For testing purposes, you may use any of our provided Test Cards.

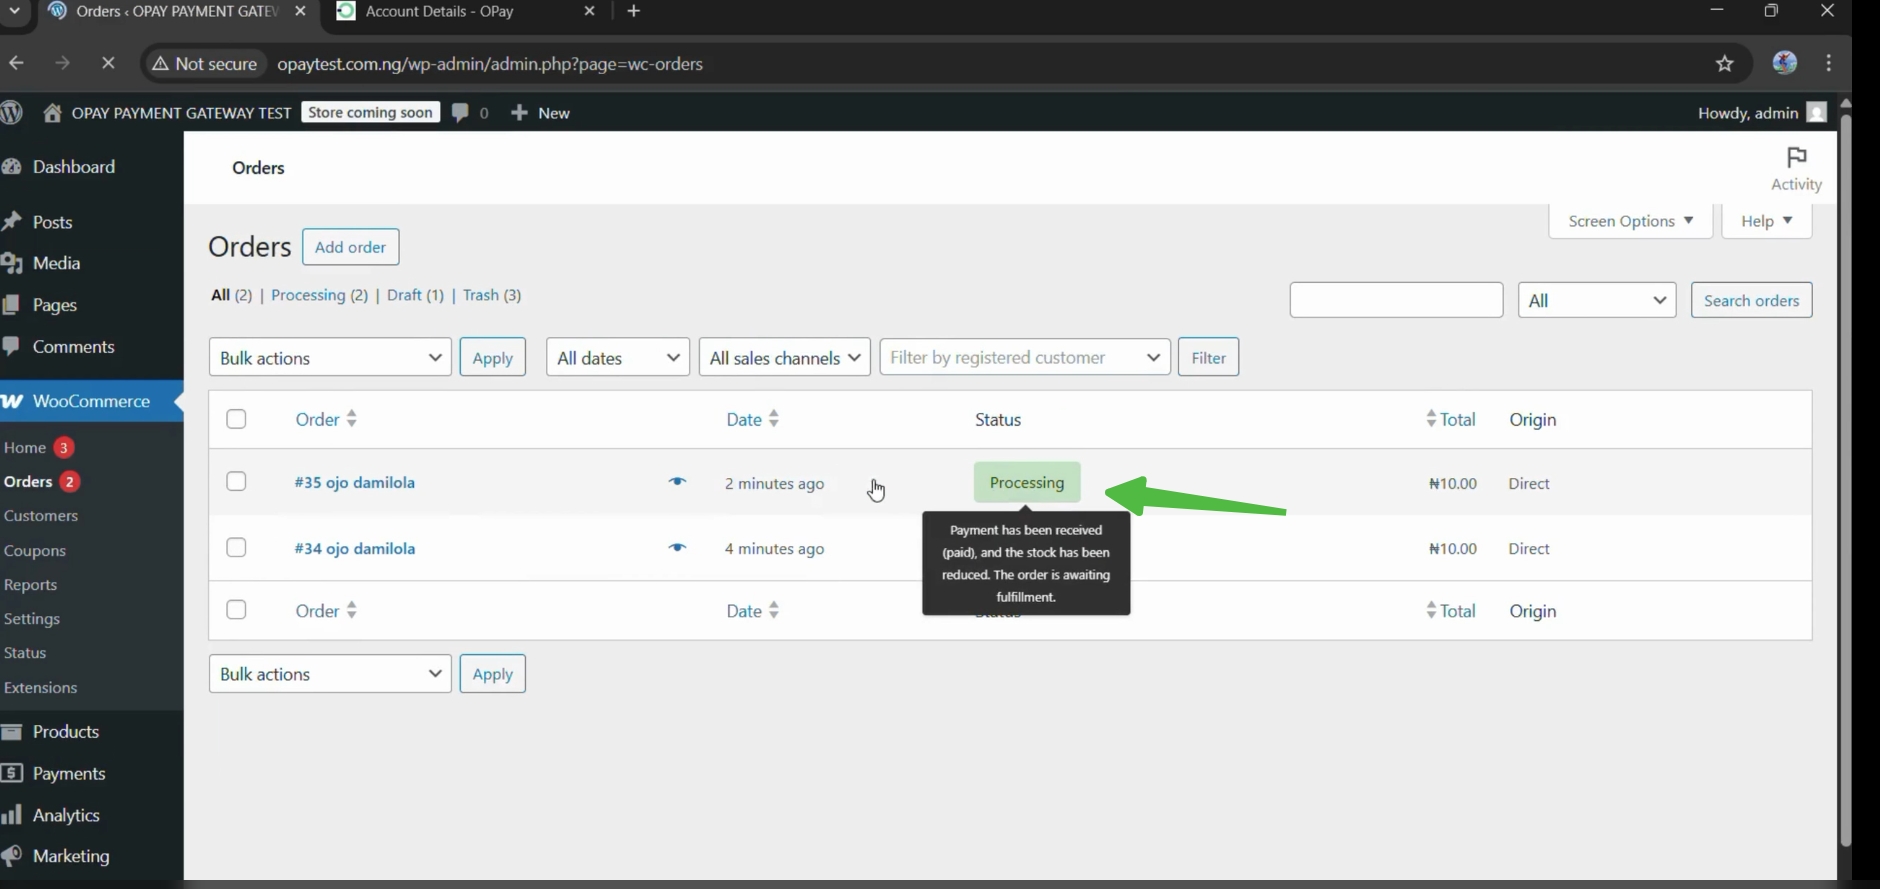
Orders Management
- Go to WooCommerce section.
- Select Orders subsection.
- In the orders page, you will find a list of your orders.
- You will find the status of each order depending on the payment status. Note that in a case where your customer chooses to pay at any OPay POS, the status will be updated automatically once the payment has been done.
| Payment Status | description |
|---|---|
| Cancelled | Cancelled Payment. |
| Pending Payment | The order is waiting payment by your client. |
| Processing | Payment done, however, it will be rendered processing until you change the order status to completed. You will need to do that in case of orders requiring shipping for example. |
| On Hold | Payment is on hold. |
| Completed | The payment has been completed. |
| Refunded | Refund has been issued to your customer. |
| Failed | The payment has been failed. |
Video Tutorial
You can watch a step-by-step video tutorial for the plugin installation process here.